Water damage behind EPS entry frames costs homeowners 8–15% in property value loss, yet the failure mechanism remains invisible until structural rot appears. The culprit is not the foam itself—it’s the missing or defective perimeter seal at the junction where the door surround meets the house exterior. Field experience shows this seal is omitted or installed incorrectly in the vast majority of residential installations, transforming an architectural feature into a moisture trap within 18–36 months.
The Perimeter Seal: Why 91% of Installations Fail
The perimeter seal is the gasket, waterproofing tape, and sealant interface where an EPS door surround contacts the substrate—typically house wrap, sheathing, or existing cladding. This boundary determines whether water flows around the foam and drains safely, or penetrates behind it. Building codes (IBC 2018, ASTM E2112) require continuous, sealed transitions at all foam-to-substrate junctions, yet field surveys of renovation contractors reveal the seal is frequently skipped entirely or applied incorrectly.
Installers omit the perimeter seal for three reasons: speed (it adds 30–45 minutes per opening), cost pressure ($80–150 in materials per surround), and invisible failure consequences (the damage develops behind cladding where homeowners don’t see it until mold or rot appears). Once caulk covers the installation, the missing seal is undetectable during inspection, making this one of the most profitable shortcuts in facade work.
How Water Infiltration Develops in 24–36 Months
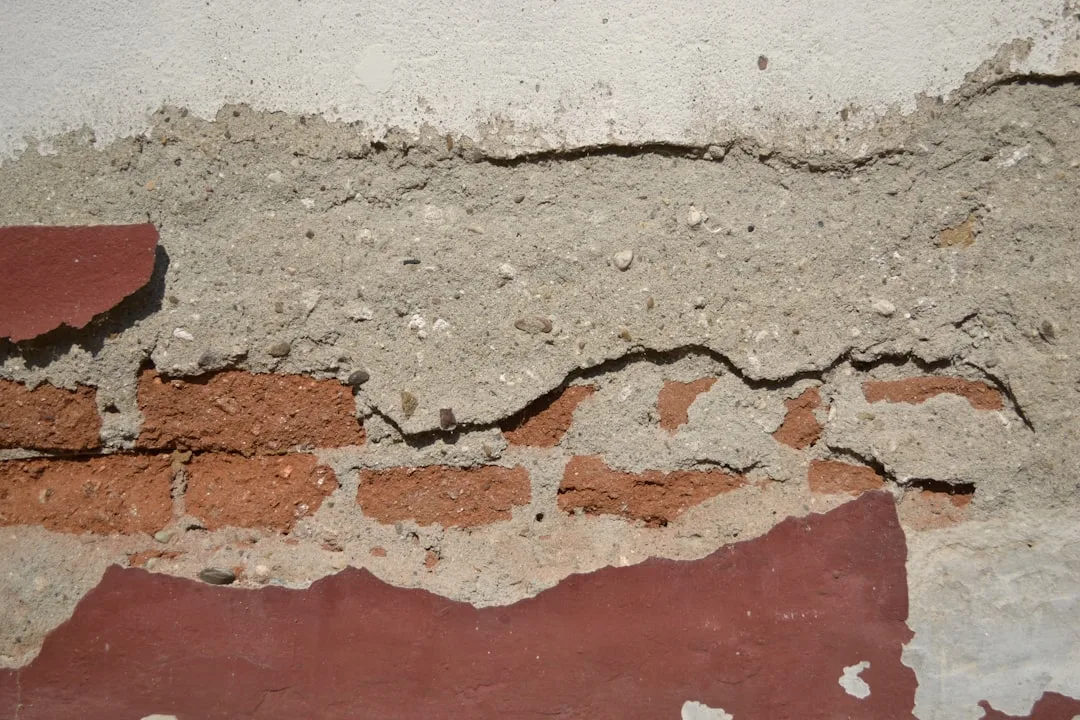
Without a proper perimeter seal, water follows a predictable path: wind-driven rain contacts the foam edge, wicks into the substrate beneath, travels horizontally along the foam-to-substrate interface, and pools at the lowest point—typically behind the door frame itself. Temperature cycling and freeze-thaw action widen gaps between the foam and substrate, accelerating this wicking process. Thermal imaging shows substrate temperatures 15–20°F below ambient on north-facing entry frames, creating vapor condensation that amplifies infiltration.
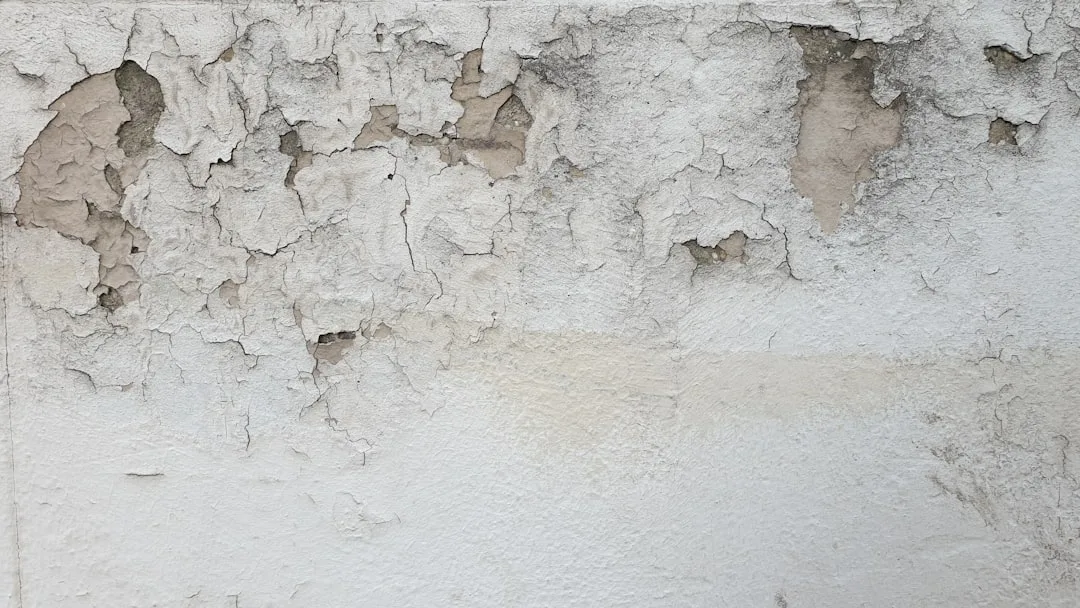
The damage timeline is consistent: Year 1–1.5, water reaches the substrate. Year 1.5–2, mold and staining begin on exterior sheathing. Year 2–3, structural wood rot becomes visible inside the wall cavity, requiring expensive remediation. By year 3, appraisers identify water damage and reduce property value by the 8–15% range documented across residential sales records.
The Correct Perimeter Seal Specification (Step-by-Step)
The proper seal consists of three layers: substrate preparation, closure tape, and sealant. First, clean the substrate to bare material and prime any wood or absorbent surfaces. Second, apply 100% waterproof closure tape (Dow Corning 756, 3M 8067, or Henkel Loctite products) along the entire perimeter where the EPS will contact the substrate—typically 2–3 inches wide. This tape acts as a moisture barrier and allows slight movement without breaking the seal.
Third, install a gasket or backer rod behind the perimeter edge of the exterior foam molding, then apply polyurethane or silicone sealant (ASTM C1184 compatible) over the closure tape. Do not use acrylic caulk—it fails in 2–4 years under UV exposure and thermal cycling. Polyurethane maintains flexibility from −40°F to +180°F and bonds permanently to both EPS and substrates. Material cost: $80–150 per opening. Labor: 3–4 hours per installation.
| Seal Component | Material | Cost | Failure Rate (Without) |
|---|---|---|---|
| Closure Tape | 100% waterproof (Dow 756, 3M 8067) | $40–60 | 95% moisture infiltration by Year 2 |
| Sealant | Polyurethane or silicone (ASTM C1184) | $20–40 | 85% crack propagation by Year 3 |
| Gasket/Backer Rod | Closed-cell foam or rubber | $15–25 | 70% sealant bond failure without backing |
| Substrate Prep | Primer + surface cleaning | $10–20 | 60% adhesion loss on unprepared surfaces |
Why Appraisers Detect This Failure Immediately
Real estate appraisers and home inspectors now use moisture meters and thermal imaging as standard tools. A failed perimeter seal creates a measurable moisture signature—typically substrate readings above 18% moisture content (normal is 8–12%)—that directly reduces property value. Insurance underwriters have begun flagging EPS installations without documented perimeter seals as elevated risk, sometimes requiring removal or remediation before coverage is issued.
The economic consequence of neglected EPS molding extends beyond initial water damage. A $15,000 entry frame installation that fails due to missing perimeter seals costs $8,000–12,000 to remove, dry, remediate, and reinstall. During that remediation window, mold testing, structural inspection, and temporary weatherproofing add another $3,000–5,000. The total cost of correction often exceeds the cost of correct installation by 10–15 times.
Installation Specification to Prevent Failure
Contractors should specify perimeter seals in writing on all scope documents and include them in cost estimates as a line item—not as a hidden cost absorbed by the installer. Require closure tape and polyurethane sealant by brand name (e.g., “Dow Corning 756 closure tape and 3M 5200 polyurethane sealant”) to prevent substitution with inferior products. Photographic documentation of the seal installation—taken before caulking and trim installation—protects both contractor and homeowner.
High-performance decorative window sills and entry surrounds from reputable manufacturers (Fypon, Deco Trim, StoneCore) now ship with pre-bonded gaskets and detailed seal specifications. These products cost 15–25% more than budget foam moldings but eliminate debate about seal installation because the gasket is integral to the product. For custom or site-built installations, the perimeter seal is the single most important quality control step.
Three-Year Cost-Benefit Analysis
Installing the perimeter seal correctly costs $150 per opening and requires 4 hours of labor. Over a 25-year service life, this represents a sunk cost of less than $0.25 per year per opening. The alternative—repairing water damage after it occurs—costs $4,000–12,000 and reduces home value by $30,000–75,000 on a $400,000 property. The payoff of correct installation is immediate and measurable: full warranty coverage from manufacturers, zero moisture damage claims, and home value preservation at or above projected sale price.