EPS swelling on your facade is not a surface cosmetic defect—it is a water saturation problem already underway inside the foam before the first visible bulge appears. Contractors almost never explain this because the damage timeline hides the root cause: moisture has already migrated into the polystyrene matrix weeks before anyone notices the molding is expanding. This creates a paradox: by the time you see a swollen cornice or window sill, the water has already compromised adhesion, weakened the bond to the substrate, and set the stage for separation and failure within 12–36 months.
Why EPS Absorbs Water Faster Than Contractors Admit
EPS foam is a closed-cell polymer, but “closed-cell” is a relative term. Typical facade-grade EPS (20–30 kg/m³ density) contains millions of tiny air pockets connected by capillary paths. These paths are small enough to block liquid water penetration under normal splash conditions, but they act like a highway for water vapor. Once vapor condenses inside the foam—either from rain-driven wind pressure, interior humidity migration, or condensation at the insulation interface—the water begins moving through the material via capillary rise.
Field measurements show unprotected EPS absorbs 5–15% of its mass in water within the first year of facade exposure depending on climate zone and orientation. In humid subtropical climates or on north-facing walls where drying is slowest, absorption can reach 12% annually. The culprit is not solid water buildup but rather vapor diffusion into the foam matrix combined with capillary action drawing moisture upward from any wet substrate—a roof joint, a crack in the base EIFS layer, or an improperly sealed expansion gap.
Standard foam grades used in exterior moldings (EPS 25–30) are engineered for thermal insulation performance, not facade moisture tolerance. Unlike specialized closed-foam boards or XPS (extruded polystyrene), EPS relies entirely on its exterior finish coat and sealants to manage the moisture boundary. Remove or damage that outer barrier, and the foam begins swelling within weeks.
The 6-Week Absorption Phase Nobody Monitors
Swelling EPS does not happen all at once. The process unfolds in predictable stages, and missing even one inspection window means you miss your chance to catch the problem before failure mechanics accelerate. Weeks 1–6 after exposure, moisture diffuses into the outer 10–15 mm of the foam. The expansion is microscopic—less than 0.05% linear dimension change—and completely invisible to the naked eye. At this stage, the foam is still structurally sound and the adhesive bond is intact.
Weeks 6–16, water migrates deeper into the molding and expands the foam uniformly throughout the cross-section. Swelling increases to 0.3–0.8% linearly. This is where the hidden damage accelerates: the adhesive layer, typically 3–5 mm thick, begins experiencing tensile stress as the foam underneath expands but the substrate (concrete, brick, or EIFS base) does not. The bond layer is now being pulled apart from both sides—the substrate resists expansion while the foam pushes outward.
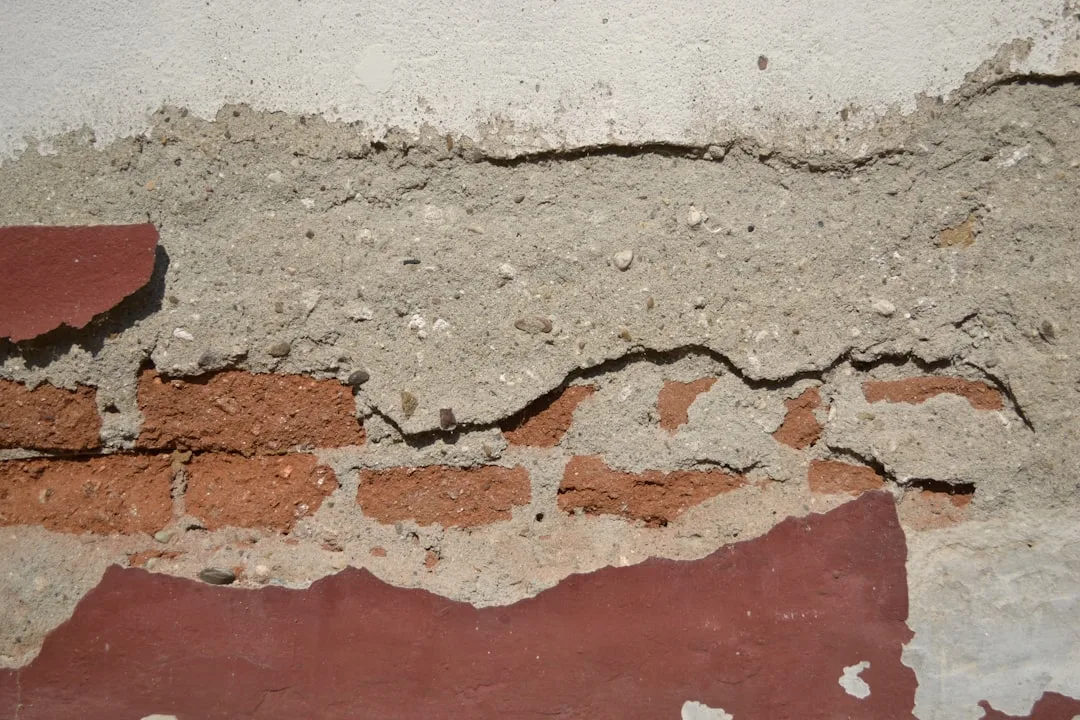
Weeks 16–26, visible bulging appears in flat areas. Swelling reaches 1–2% linearly, which translates to 2–4 mm outward movement on a 200 mm wide cornice. Cracks appear at stress concentration points: inside corners, around fasteners, at expansion joints. By week 26, the structural damage is irreversible. The adhesive has micro-fractured or debonded completely in patches, water has penetrated to the back face of the molding, and separation is imminent.
Moisture Sources: Where Water Actually Enters Your EPS Moldings
Contractors often blame weather—heavy rain, snow melt, high humidity—but field investigation shows the real culprits are installation defects that create pathways for water entry. Rain-driven wind pressure can force water into gaps at expansion joints or under loose finish coats, but the dominant moisture source is capillary rise from the substrate itself. Moisture migrates upward from a wet base layer, condensation at cold surfaces, or water trapped during construction.
Expansion joints left unsealed or filled with non-compatible sealant (silicone instead of acrylic-based, or cracked latex) allow water vapor diffusion directly into the foam edge. A single unsealed joint on a 3 m cornice can introduce 10–30 liters of water vapor per year depending on climate and sun exposure. Finish coats applied over damp substrate trap water behind the coating, creating a pressure chamber where humidity condenses and accumulates.
Missing or incomplete exterior foam moldings sealant at the base flange—where trim meets the primary wall—is the most common failure point. A gap as small as 2 mm allows capillary water to migrate directly into the adhesive layer, bypassing the face seal entirely. Window sill installations without proper flashing compound this problem: water from the sill pan drains behind the flange, saturates the adhesive, and swelling begins weeks before the occupant knows there is a problem.
Detecting Swelling Before Separation Costs Thousands
Visual inspection alone is insufficient. Swelling can reach 0.5% linear expansion—enough to create internal stress and weaken adhesion—before the untrained eye detects any bulging. Instead, use a straightedge or feeler gauge held perpendicular to the molding surface every 300 mm horizontally and vertically. Any deviation greater than 1 mm (0.1% sag or bulge) suggests internal swelling in progress.
Press firmly on flat areas of the cornice or sill with your palm. Saturated or partially swollen foam will feel slightly soft or compressible compared to dry material. A moisture meter rated for wood and composite materials can estimate foam dampness, though readings must be calibrated to the specific EPS brand and density being tested. Record baseline readings within 30 days of installation, then monitor quarterly during the first 3 years.
At expansion joints, close examination with a flashlight will show hairline cracks propagating from the sealant bead into the foam—a sign moisture and internal stress are already accumulating. These cracks often precede visible molding swelling by 2–4 weeks. Any separation or gaps appearing between trim pieces where caulk exists—without recent thermal cycling—indicates swelling is displacing the molding horizontally or vertically.
Why Standard Finish Coats Fail to Protect EPS from Moisture
Acrylic latex paint—the most common finish for EPS facades—offers virtually no moisture barrier if applied as a single coat. Water vapor passes through latex at a rate of 10–30 perms (metric Sd values of 0.06–0.15 m), which means water diffuses through the film almost as freely as through air. Two-coat systems reduce this to 5–15 perms, still inadequate for long-term facade exposure in humid or rainy climates.
The industry standard protective system pairs an acrylic primer base coat (applied to the mesh-reinforced fabric layer already embedded in the EPS finish) with a reinforced finish coat and sealed joints. When applied correctly over properly cured EPS and substrate, this system reduces foam water absorption to 1–3% annually—a manageable rate for most climates. However, this assumes perfect surface preparation, dry substrate, compatible materials, and sealed expansion gaps.
Field failures occur because one or more of these conditions is violated. Primers applied over damp foam trap moisture underneath, creating the pressure-chamber effect. Finish coats applied at temperatures below 10°C or above 30°C fail to cure properly and develop micro-cracks. Expansion joints filled with non-compatible sealant (polyurethane or silicone over acrylic base) create stress concentrations where moisture preferentially enters the foam.
High-performance alternatives exist: elastomeric acrylic finish systems (Sherwin-Williams Duration or Benjamin Moore Resilience lines) offer superior elongation and crack bridging at 2–3× the cost of basic latex. Vapor-open mineral coatings (silicate-based) allow water vapor through the finish but inhibit liquid water penetration via capillary blocking. These specialized products are rarely specified because contractors default to the cheapest option and because most architects and builders assume standard acrylic latex provides adequate protection.
| EPS Density (kg/m³) | Unprotected Exposure (% absorption/year) | With Finish Coat (% absorption/year) | Water Vapor Permeability (Sd value) |
|---|---|---|---|
| 15–20 (insulation grade) | 8–15% | 2–4% | 0.5–1.5 m |
| 20–30 (facade molding standard) | 5–12% | 1.2–3% | 1.0–2.5 m |
| 30–35 (facade decoration high-density) | 3–8% | 0.6–1.8% | 1.5–3.5 m |
| 35+ (premium molding) | 2–5% | 0.4–1.2% | 2.0–4.5 m |
Installation Techniques That Stop Moisture Swelling Before It Starts
Prevention requires a layered defense: dry substrate, sealed expansion paths, moisture-rated finish system, and mechanical fastening independent of adhesive alone. Begin with substrate moisture content: concrete, EIFS base, and brick should measure ≤12% moisture content before any molding is installed. Use a moisture meter calibrated to the substrate type and take readings at least 5 locations per wall section. If moisture exceeds this threshold, delay installation until the substrate cures or dries naturally.
All expansion joints—both vertical and horizontal—must be sealed before finish coat application. Use an acrylic-based polyurethane or acrylic latex caulk compatible with both the EPS foam and the finish system being applied. Avoid pure silicone, which does not bond to acrylic primers and creates a differential expansion failure. Joints should be filled flush with the foam surface, not recessed, because a recessed joint traps water by capillary action. Back-rod the joint with foam backer rod (not open-cell foam, which absorbs water) if the joint width exceeds 6 mm.
Mechanical fastening—corrosion-resistant anchors or stainless steel fasteners spaced 300–400 mm on center—must never be omitted for large moldings, sills, or cornices. Many contractors rely on adhesive alone (a 3–5 mm bed of polyurethane construction adhesive) because fastening is labor-intensive and visible. This is a direct path to failure: adhesive alone cannot sustain the tensile and shear stresses created by swelling, thermal cycling, or impact. A single row of fasteners through the top flange of a cornice costs $200–400 per lineal foot in labor but eliminates separation risk entirely.
Base flange sealing is critical. The bottom edge where decorative window sills or trim meets the primary wall must be sealed with a continuous bead of compatible sealant before the molding is set. Do not rely on grouting or caulk applied after installation—gaps will form as the substrate settles or as thermal movement occurs. Use a primer-compatible polyurethane or butyl tape for this base flange seal, applied to the back of the molding flange before adhesive and fastening.
Cost Implications: Prevention Versus Replacement
A swollen or failed EPS cornice that requires removal and reinstallation costs $35–75 per linear foot in labor, plus material replacement at $8–25/ft depending on profile complexity. A 40 ft cornice damaged by moisture swelling represents $1,400–3,000 in unplanned repair costs. In contrast, the incremental cost of proper installation—mechanical fastening, sealed joints, and premium finish system—adds $4–12 per linear foot to the original $15–40/ft EPS material and application budget.
This means spending an extra $160–480 on a 40 ft installation prevents a $1,400–3,000 failure in year 2–3. The economics are stark, yet contractors often do not perform this calculation because they operate on fixed budgets and do not bear the repair liability after the first year. Homeowners and property managers must demand this level of detail in writing as part of any facade renovation or new construction specification.
Reputable suppliers and installers will provide written documentation of substrate preparation, moisture readings, fastening locations and specifications, sealant type and application dates, and finish coat curing conditions. If these are not included in your contract or invoice, swelling risk is very high. Field experience shows contractors who document these steps experience near-zero moisture-related EPS failures, while those who skip documentation see 15–40% failure rates within 5 years.
Warranty Gaps and Who Pays When EPS Swells
Most exterior renovation or new construction warranties exclude damage caused by “moisture intrusion” or “improper installation.” When swollen EPS appears, manufacturers and contractors immediately classify it as a result of one or both of these excluded conditions. Proving who failed (designer, contractor, supplier, or building owner via maintenance neglect) requires forensic analysis: core sampling to measure absorbed water content, photographic documentation of substrate condition at installation, and testing of sealants and finish coats for compatibility and adhesion.
This forensic work costs $1,500–4,000 and is rarely pursued because the molding itself costs less to replace than to litigate fault. The burden of proof falls on the homeowner or property manager to demonstrate that the molding was installed to specification and that defects arose from manufacturing or design, not from poor maintenance or building envelope failure.
Your only reliable defense is contemporaneous documentation: date-stamped photographs of the substrate before molding installation, moisture meter readings, sealant product names and application dates, finish coat application logs including temperature and humidity conditions, and inspection reports showing the molding condition at 30 days, 90 days, and 12 months post-installation. If swelling appears within this documentation timeline and no owner-caused damage occurred, you have grounds to pursue warranty claims.
Choosing EPS Grade and Density to Minimize Swelling Risk
Higher-density EPS absorbs water more slowly than lower-density material, but density alone is not the controlling variable. A 35 kg/m³ EPS cornice absorbs water at roughly 50–60% the rate of a 20 kg/m³ product, but it also costs 40–60% more and is harder to machine into detailed profiles. Most architectural moldings use 25–30 kg/m³ EPS because it balances water absorption risk, cost, and machinability.
Specialty products exist for high-moisture environments: XPS (extruded polystyrene) boards offer moisture absorption of 0.3–0.5% by volume after 24 hours immersion—dramatically lower than EPS—but XPS is difficult to profile and costs 3–5× more than equivalent EPS moldings. Polyurethane foam (PUR) offers superior moisture tolerance and thermal performance but requires specialized application equipment and coating systems. For most residential and commercial facade applications in North America, properly installed EPS 25–30 with sealed joints and acrylic finish is the standard approach.
When specifying moldings, request EPS material certified to ASTM C578 Type XIX or higher (indicating minimum physical property standards). Verify that the supplier provides moisture absorption test data for the specific product and density. A reputable foam molding manufacturer will publish water absorption values (typically 2–8% by weight after 7-day immersion per ASTM D2842) and recommend corresponding finish systems and application protocols.
What to Do If Your EPS Moldings Are Already Swelling
Early-stage swelling (0.3–0.5% visible bulge) can sometimes be halted by aggressive sealing of all expansion joints and application of a high-performance acrylic finish coat with extended drying time. This works only if the substrate has dried and the swelling has not yet compromised adhesion. Have a professional inspect with a moisture meter and adhesion-pull test (mechanical probe that measures bond strength) before committing to remediation.
If swelling exceeds 1% linearly or if adhesion testing shows bond failure in patches, removal and replacement is the only reliable solution. Partial removal (replacing only the worst sections) creates visible lines and stress concentrations; full replacement of affected runs costs more upfront but prevents secondary failures. Use the replacement project as an opportunity to address the root cause: Why did swelling occur? Was the substrate inadequately sealed or flashed? Were expansion joints left open? Was substrate moisture excessive? Correct these conditions or the new moldings will fail identically within 2–3 years.
Document the failure photographically and in writing, including moisture meter readings from inside the removed molding if possible. Contact the original installer or manufacturer with this evidence and request explanation or warranty consideration. Even if warranty claim denial is final, the documentation protects you legally if the property is later sold and the buyer discovers the problem.