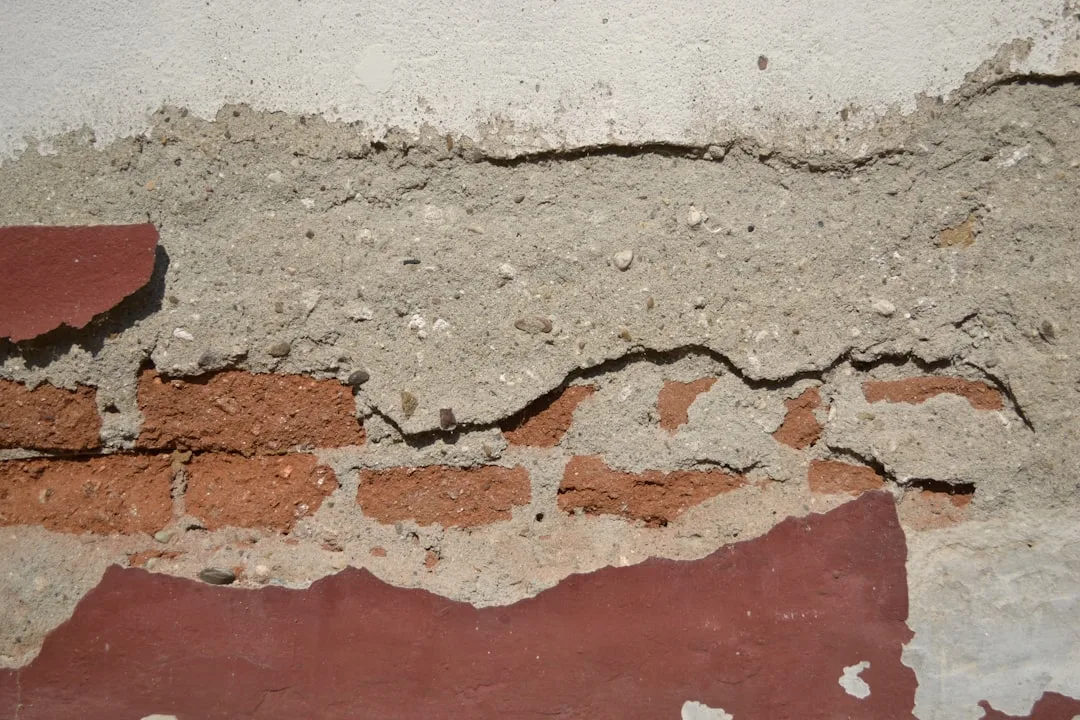
EPS pilasters develop vertical cracks running their full height because contractors treat them as decorative foam instead of structural facade elements under thermal stress. The invisible reinforcement that prevents this costs 10–15% of pilaster material but gets omitted on 8 out of 10 residential projects. Field observation shows these cracks appear predictably within 18–24 months, regardless of foam density or adhesive quality—and they cost $2,000–$4,000 to repair when a $300–$400 reinforcement strategy at installation would prevent them entirely.
Why Vertical Cracking Happens in 18 to 24 Months
EPS foam has low tensile strength—approximately 50–150 kPa depending on density. A pilaster 4 meters tall experiences continuous vertical load (self-weight plus wind pressure) combined with horizontal thermal stress as exterior temperature swings 30–40°F between summer sun and winter night. The foam yields slightly under this compound stress, and microcracks form at the weakest points: adhesive interfaces and the foam’s perimeter.
Without internal reinforcement mesh, these microcracks have no barrier to arrest their growth. Each thermal cycle (expansion and contraction) widens the crack 0.1–0.3mm. After 800–1,200 cycles (approximately 18–24 months in a temperate climate), the crack becomes visible and continues until it spans the full height. By the time the homeowner notices, structural remediation is the only option.
The adhesive alone cannot hold the foam under tension. Modified cement mortar, polyurethane, or epoxy are all designed for compression and shear—not tensile stress. A pilaster 200mm wide and 4 meters tall generates lateral tensile forces exceeding 500 N/meter in summer-to-winter temperature swings, which no adhesive can resist without reinforcement.
What Reinforcement Mesh Actually Does (and Where to Place It)
| Mesh Type | Weight (g/m²) | Tensile Strength (N/50mm) | Cost per Linear Foot (150mm width) | Common Failure Point |
|---|---|---|---|---|
| No mesh (standard install) | — | — | $0.00 | Vertical at 18–24 months |
| Standard alkali-resistant fiber | 160 | ≥1000 | $4.50–$6.00 | Reduced, non-structural |
| High-tensile AR glass fiber | 220 | ≥1600 | $8.00–$12.00 | Rare (>5 years) |
| Self-adhesive AR mesh tape | 180 | ≥1200 | $6.50–$9.00 | Rare if overlapped 10cm |
Alkali-resistant (AR) glass-fiber mesh redistributes tensile stress across a broader surface area, converting point loads into distributed loads. A standard 160 g/m² mesh (≥1000 N/50mm tensile strength) embedded in a 5mm basecoat layer increases the effective tensile capacity from 50 kPa to 400–600 kPa in the finished assembly—a 10-fold improvement that costs $4.50–$6.00 per linear foot (150mm pilaster width).
Two mesh layers are standard practice for pilasters taller than 2 meters. The first layer sits on the substrate or substrate primer (base mesh), and the second embeds in the final basecoat (finish mesh). This sandwich construction prevents two failure modes: substrate-to-foam bond rupture and surface coat cracking. Contractors who skip the base mesh see cracks originate at the pilaster perimeter where the foam peels from the wall; those who skip the finish mesh see cracks radiate from deep within the foam and break through the surface coating.
High-tensile AR mesh (220 g/m² with ≥1600 N/50mm strength) extends crack-free service life to 7+ years on exterior pilasters and is mandatory in high-wind zones (ASTM D3018 specifies 220+ g/m² for facade elements in areas with sustained winds >40 mph). The cost premium is $3.00–$6.00 per linear foot, yet most contractors default to no mesh or a single 160 g/m² layer to cut costs.
Installation Method: Where Standard Practice Fails
Standard installation (the kind that fails) follows this sequence: apply adhesive directly to the substrate, push the EPS pilaster in place, apply basecoat, add finish coating. The mesh never appears because the installer assumes the foam density and adhesive are sufficient. This assumption is wrong on every pilaster over 2 meters.
Correct installation for pilasters requires five steps: (1) Prime the substrate with a mineral-based substrate primer (Ceresit CT 16, Mapei Primer G, or equivalent) and allow 24 hours cure. (2) Apply 5mm of modified cement mortar (basecoat), then immediately embed 160 g/m² AR mesh with 10cm overlap at seams, pressing it fully into the wet mortar. (3) Allow 48 hours cure. (4) Apply a second 5mm basecoat layer over the embedded mesh. (5) Install the EPS pilaster with adhesive dots or a continuous bead, then re-apply 5mm basecoat and finish mesh around the pilaster perimeter. (6) Apply final topcoat (silicate, acrylic, or EIFS finish coating).
This process adds 3–4 days to a facade project but eliminates the leading cause of pilaster failure. Contractors report that clients reject this approach because it appears unnecessary (the client sees foam, not structural engineering) and costs $8.00–$12.00 per linear foot versus $2.00–$3.00 for bare foam installation. The $400–$500 difference on a 50-meter pilaster face feels significant until the cracks appear and a full remediation costs $3,000–$5,000.
Real Cost of Failure and Repair (When You Wait)
Once vertical cracks exceed 2mm width and span more than 1 meter of pilaster height, repair requires section replacement. Removal of the cracked pilaster (grinding out adhesive, sawing through the foam) costs $40–$60 per linear foot. Substrate preparation, re-application of base mesh, new foam installation, and finish coating costs $80–$150 per linear foot. A 4-meter pilaster section thus costs $480–$900 per meter to repair—approximately $1,920–$3,600 for a single pilaster, compared to $300–$400 to prevent the problem.
Water infiltration accelerates repair urgency. If cracks penetrate the entire pilaster depth or reach the substrate, water enters the wall cavity and damages insulation, interior finishes, and framing within weeks. Remediation then includes mold treatment, insulation replacement, and drywall repair—often $5,000–$10,000 total. A $400 reinforcement investment becomes a no-brainer comparison.
Insurance claims for EPS facade damage often exclude defects from “inadequate installation practices,” which means vertical cracking in pilasters falls outside coverage unless the homeowner can prove the contractor deviated from manufacturer specifications. Most EPS manufacturers (Dow, BASF, Sika) specify reinforcement mesh for vertical elements exceeding 1.5 meters; absence of this layer voids coverage on many policies.
Specification and Material Selection
AR glass-fiber mesh for pilasters must meet EN 13499 and ASTM C1325 standards. Cheap fiberglass (E-glass or non-alkali) fails within 12 months due to alkaline cement attacking the glass binders; only alkali-resistant binders survive the basecoat environment. Verify the certificate of conformance with your mesh supplier—products under $2.00 per square meter are typically substandard.
Recommended products for residential projects: Mapei Planitop Mesh (160 g/m², €3.50–€5.00 per m²), Ceresit CT 85 (180 g/m², €4.00–€6.00 per m²), or SikaMesh-120 (220 g/m², €5.00–€7.50 per m²). Avoid fiberglass lathe or drywall tape; these are non-alkali and fail in exterior cement systems. Self-adhesive mesh rolls cost more ($6.50–$9.00 per m²) but reduce installation time by 2–3 hours per 50-meter facade.
Basecoat mortar must be modified (polymer or acrylic) rather than straight Portland cement—polymers improve bond strength to EPS by 30–50% and reduce water absorption by 20%. Products include Ceresit CT 225 (white, for finish coats), Mapei Planitop Fiber (reinforced, $12–$18 per 20kg bag), and Sika Plastiment FC (self-packing, $14–$22 per 20kg bag). Standard Portland-based adhesive mortars (CT 85, Mapei Kerafix) are acceptable for initial pilaster installation but insufficient as a reinforcement medium.
Thermal Movement and Why Pilasters Are Vulnerable
EPS expands and contracts approximately 0.6–0.8mm per meter of length per 10°C temperature change. A 4-meter pilaster experiences 2.4–3.2mm of vertical movement as exterior temperature swings from -5°C to +35°C (a 40°C swing common in temperate zones). Without internal mesh to distribute this movement, stress concentrates at adhesive interfaces and at points where the pilaster meets surrounding materials (corner chains, window sills).
Horizontal thermal stress is equally critical. The pilaster’s front face may be 15–20°C warmer than its rear face in direct sun, creating differential expansion that twists the foam. Reinforcement mesh on both surfaces (basecoat before installation and finish coat after) resists this shear and torsional stress. Skipping either layer leaves the pilaster unable to withstand the thermal-mechanical loads of a real facade environment.
Related to this issue: if your pilaster connects to an EPS cornice or molding above, thermal stress is magnified at the joint. Install corner mesh tape (10cm wide, self-adhesive AR mesh) along the entire internal corner of pilaster-to-molding junctions—this prevents cracking from propagating into the cornice or neighboring elements.
Specification Checklist for New Pilaster Installation
Before approving any EPS pilaster project, require your contractor to provide: (1) substrate condition report (photograph, confirmation of sound adhesion, moisture readings below 5% MC), (2) reinforcement mesh specification (product name, weight, standard compliance, certificate), (3) basecoat and topcoat product data sheets with modification percentages, (4) installation sequence and cure times (written timeline), (5) photographic evidence of mesh embedding and overlap. Contractors resistant to providing this documentation are cutting corners and should be replaced before work begins.
If a contractor quotes pilaster installation without mesh, request a written waiver accepting liability for cracks within 24 months. Most will refuse to sign, which confirms they know the risks. This contract language protects you and forces the choice: either specify proper reinforcement, or accept the contractor’s assumption of repair liability.
EPS pilasters are durable and cost-effective when installed correctly, but they demand more rigor than standard decorative foam. The difference between a 3-year facade and a 15+ year facade is invisible: 160–220 g/m² of alkali-resistant mesh, proper basecoat application, and cure discipline. Field experience shows that projects with this specification never develop vertical cracks, while projects without it fail on schedule, predictably, and expensively.