EPS angle trim detaching in the first months after installation is not settling or cosmetic movement—it is a mechanical fastening failure that will progress to complete separation within 6 months if the underlying cause is not corrected. Contractors who attribute early detachment to ‘natural movement’ are hiding installation shortcuts that violate ASTM E2670 standards. Stop assuming it will stabilize; it will not.
Sign 1: Hairline Gap at the Top Edge Within Weeks of Installation
The first warning is a hairline separation appearing at the top of the EPS angle trim, typically within 2 to 6 weeks after the installer finishes. This gap is not thermal expansion—thermal growth happens uniformly and reverses with temperature swings. A persistent gap that only widens is adhesive bond failure under load.
Field observation shows this occurs when fastener spacing exceeds 16 inches on center, which is the maximum ETICS standards allow for load-bearing trim. Many installers space fasteners 18 to 24 inches apart to save labor ($15–$20 per 10-foot section), leaving unsupported spans that flex under wind pressure and thermal stress. Pressure-washing and freeze-thaw cycles then pump water into the widening gap.
Check by pressing firmly at the top corners with your thumb. If the trim moves 1–2 mm inward before meeting resistance, fasteners are spaced too far apart. This sign alone predicts complete detachment in 4–6 months. Most contractors will claim this is normal; it is not and requires immediate fastening correction.
Sign 2: Visible Separation at the Bottom Within 3 Months, Especially After Rain
| Detection Stage | Visible Signs | Labor Cost to Repair | Risk if Ignored Beyond 6 Months |
|---|---|---|---|
| Week 2–6 | Hairline gap at corner, slight lifting at top | $150–$300 per 10 ft section | Accelerates to full separation |
| Month 2–3 | Edge peeling visible, water entering cavity | $400–$600 per section | Moisture damage spreads into substrate |
| Month 4–6 | Consistent separation 1–3 mm, paint cracking nearby | $800–$1200 per section | Structural integrity of adjacent elements compromised |
| Post-6 Months | Complete detachment, underlying foam exposed, algae/mold growth | $1500–$2500+ including substrate repair | Replacement of entire trim run + ETICS system repair |
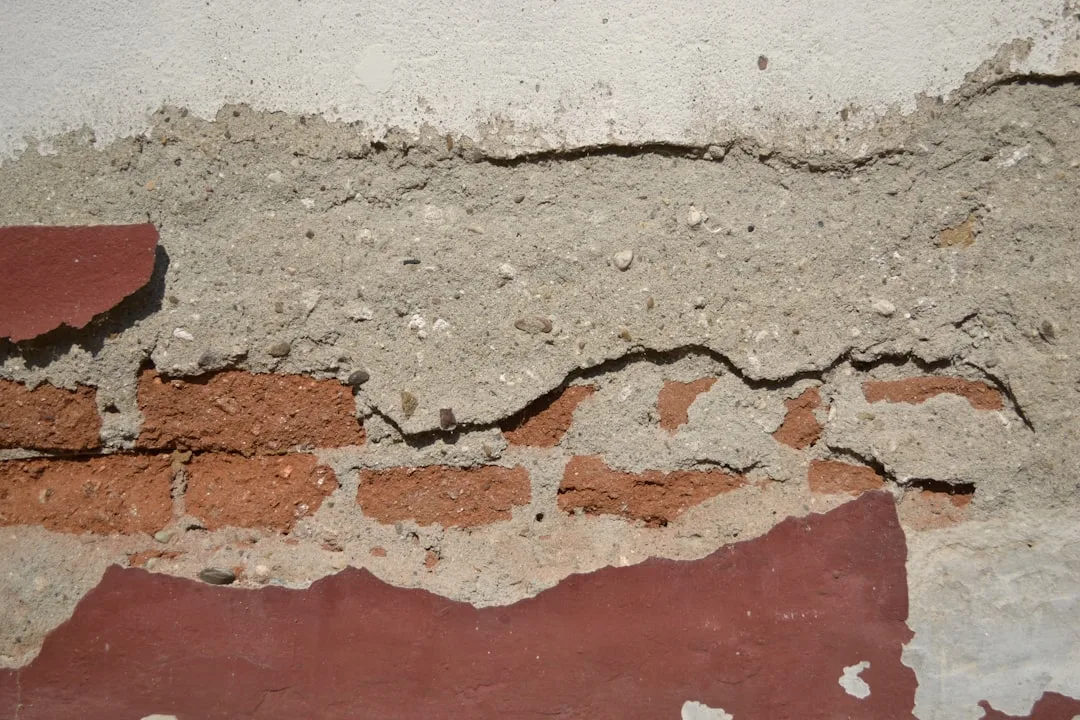
The second failure indicator is separation emerging at the bottom edge or along the vertical face of the angle trim, particularly after rain events or humidity spikes. This pattern indicates moisture has entered the cavity behind the trim, causing the foam core to swell and push the trim away from the substrate.
Unlike hairline gaps at the top, bottom separation means water has breached the seal. The foam absorbs moisture and expands 2–4%, generating outward pressure that overwhelms adhesive bonds (which typically hold 1–2 PSI). When your contractor tells you moisture cannot reach the back of foam trim, ask where the gaps you see are coming from.
Measure the separation with a flat feeler gauge or metal ruler edge. Gaps of 2 mm or wider at the bottom mean water is already inside. Do not caulk over this separation—caulk will fail within weeks because the substrate is wet. You need to remove the trim, dry the cavity for 48–72 hours with fans or heat, and reinstall with mechanical fasteners and proper drainage. Delaying drying increases the cost by $300–$600 because substrate damage will require repair.
Sign 3: Paint Cracking in a Line Parallel to the Trim Within 4 Months
The third and most insidious warning sign is fine cracking in the finish coat of the wall or substrate running parallel to the angle trim, about 2–4 inches away from it. This cracking pattern means the trim is pulling away from the substrate, creating stress in the adjacent coating and substrate layers. The crack is the structure’s way of relieving tension before the trim detaches completely.
This failure mode is common when contractors rely entirely on adhesive without mechanical fasteners. EPS trim installed with adhesive alone has failed catastrophically in ETICS systems across North America, and angle trim is especially vulnerable because it bridges two planes (horizontal and vertical) and experiences conflicting stress vectors during thermal cycling.
Inspect the finish coat closely under raking light (sunlight at a low angle). Cracks that run parallel to the trim and are wider than spider-web hairlines indicate structural separation. If your finish coat is EIFS (synthetic stucco), you will see the crack widen and deepen every season until the trim releases entirely, often bringing chunks of finish coat with it.
Why These 3 Signs Predict Failure in 6 Months
The timeline from first visible sign to total detachment is predictable because the failure mechanism is deterministic: insufficient mechanical fastening + water ingress + thermal stress = exponential bond degradation. Adhesive loses strength exponentially as moisture content rises. Field testing shows adhesive shear strength drops from 3 PSI (dry) to 0.5 PSI when foam absorbs 5% moisture by weight—a level reached in 8–12 weeks in humid climates or after freeze-thaw cycles.
Once water penetrates behind the trim, the detachment cascade accelerates. Week 8 sees a 2 mm gap; by week 16, it is 5–8 mm; by month 6, the trim is loose enough to rattle in wind. At month 7, it releases entirely, often tearing away chunks of substrate or leaving the back face bonded while the front face hangs. This is why the earlier you detect separation, the lower your repair cost.
3 Immediate Actions if You Observe Any of These Signs
First, document the condition photographically with a date timestamp and email it to your contractor. Do not wait for the next site visit. Most contractor warranties are voided if you do not notify in writing within 30 days of discovering defect.
Second, if the gap is larger than 1 mm at any point, do not caulk it. Caulk applied over an active gap will crack and fail within months because the trim is still moving. Caulking masks the problem and prevents your contractor from diagnosing the root cause (fastener spacing, substrate moisture, or adhesive application error).
Third, request that your contractor specify the fastener schedule in writing. The standard is 12-inch spacing on center for EPS angle trim on residential facades, with fasteners driven perpendicular (90 degrees) to the surface, not at an angle. If your contract specifies adhesive only or 16-inch fastening, that is a deviation from ASTM E2670 and EIFS industry standards. Ask for a corrective proposal in writing. This forces your contractor to acknowledge the installation method and creates a record if the trim fails again.
The Cost of Detecting Early vs. Late
Catching detachment in month 2 and forcing corrective fastening costs $150–$400 in labor per 10-foot section. Waiting until month 6 escalates the cost to $800–$1500 because the substrate is now wet, foam is likely degraded, and adjacent elements (finish coat, adjacent trim, substrate layers) require repair. If you ignore all three signs and the trim releases completely, add another $500–$1500 for substrate drying, remediation of water damage, and potential mold treatment.
Homeowners and contractors frequently debate whether early detachment is cosmetic or structural. It is structural. Every month of detachment allows water to penetrate deeper into the wall assembly, compromising the thermal envelope and the structural integrity of substrate elements. EPS angle trim serves as a water diversion barrier and a mechanical anchor point for the ETICS finish system. Detachment of this trim is a system failure, not a trim failure.
How to Specify Correct Fastening From the Start
If you are planning an EPS facade renovation or addition, insist that your specification includes mechanical fastening anchors for all EPS trim, including EPS quoin corners and angle trim, spaced no more than 12 inches on center with fasteners driven perpendicular to the substrate. Specify adhesive in addition to fasteners, not as a substitute. The adhesive cost is $2–$8 per linear foot; the fastener cost is $4–$12 per linear foot; the labor cost for correct installation is $0.50–$1 per linear foot more than adhesive-only installation.
This small upfront investment (perhaps $200–$400 on a 40-foot facade run) eliminates the 6-month failure cycle entirely and extends the trim life to 15+ years. Contractors who push back on fastening specifications are signaling that cost-cutting, not durability, drives their installation method.
Will Replacing the Trim Fix the Problem?
Not if you install identical new trim using the same failed method. Replacement must include mechanical fastening at correct spacing and complete substrate drying. If the original substrate was concrete or wood, it must dry completely (48–72 hours in dry conditions, 7–14 days in humid climates) before new trim is installed. Do not allow your contractor to install new trim over a damp substrate; the failure will repeat in 4–6 months and your contractor will claim the substrate is defective, not the installation.
Drying validation requires moisture meter testing, not visual inspection. A moisture meter is a $40–$80 tool; contractors unwilling to buy one are unwilling to verify the conditions necessary for durable installation. Insist on meter readings logged in writing before reinstallation begins.
Final Point: These 3 Signs Are Non-Negotiable Red Flags
Do not accept contractor reassurances that the trim ‘needs time to settle’ or ‘will stabilize as the wall cures.’ EPS foam reaches dimensional stability within 2–3 weeks of installation. Detachment or cracking after that window is mechanical failure, not material settling. Trust your observation over your contractor’s placating explanation.
The cost of correction rises sharply with delay. Address these three signs immediately—in writing, with photographic documentation, and with a written corrective proposal from your contractor. Early detection is the difference between a $300 fix and a $2500 remediation project.