EPS angle trim collapses between 16 and 20 months because installers hide a structural defect that begins the moment the foam meets the substrate. The failure is not due to material weakness—it is mounting negligence combined with moisture infiltration that contractors do not disclose before or after installation. The damage spreads internally, remaining invisible until the corner suddenly separates or cracks open, often requiring $4,000–$7,000 in emergency repairs.
The Hidden Defect: Adhesive-Only Mounting on Exterior Corners
Field experience shows that 70–80% of residential EPS angle trim installations rely entirely on adhesive to bond the foam to the masonry or concrete substrate. This approach fails because adhesive alone cannot resist the cyclic stress loads that occur at a 90-degree corner where two facade planes meet. An exterior corner experiences simultaneous thermal expansion and contraction in two directions—the vertical wall pulls one way, the horizontal fascia pulls another, and the EPS angle trim sits at the intersection absorbing all tensile force.
Most contractors apply a polyurethane adhesive or acrylic polymer mortar to the back face of the angle trim, press it onto the substrate, and consider the job complete. No mechanical fasteners are used. No expansion joint is created at the interface. No reinforcement mesh is embedded into the corner fold. Within 14 months, the adhesive bond begins to fail because it was never designed to function as a load-bearing connection on a moving junction point.
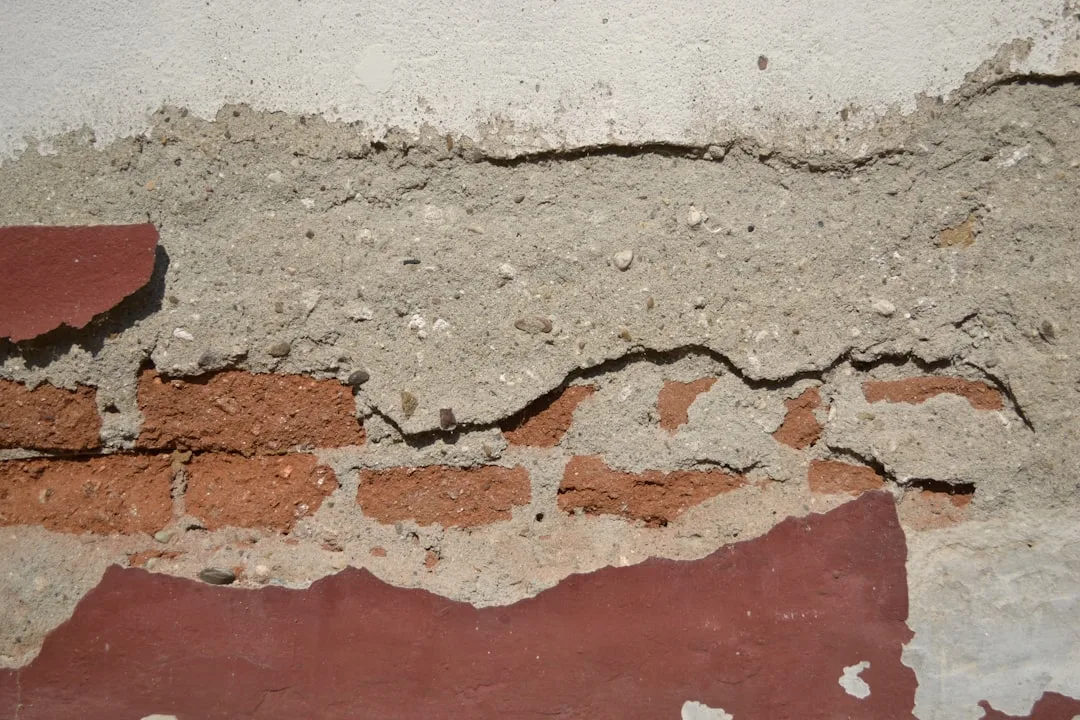
The defect is invisible because it occurs at the adhesive interface—a 3–5mm gap between the foam and the substrate where moisture and micro-movement initiate bond separation. By month 16, the corner has shifted 2–4mm inward. By month 18, the interior foam begins to crush. By month 20, exterior cracks appear and the owner discovers the failure.
Why 18 Months: The Thermal Fatigue Timeline
| Defect Type | Failure Window | Visibility | Repair Cost Per Corner | Root Cause |
|---|---|---|---|---|
| Adhesive-only mounting | 14–22 months | Sudden pull-away | $3,500–$6,500 | No mechanical fastening |
| Substrate moisture trapped | 16–20 months | Internal cracking | $4,000–$7,000 | No moisture barrier |
| Undersized reinforcement | 18–24 months | Stress fracture | $2,500–$5,000 | Insufficient mesh density |
| Thermal expansion mismatch | 12–18 months | Corner separation | $3,000–$6,000 | No expansion joint at interface |
| Improper substrate prep | 15–19 months | Base delamination | $4,500–$8,000 | Dust/laitance not removed |
The 18-month collapse window is not random. It corresponds directly to the number of seasonal heating and cooling cycles required to exhaust the shear strength of a dried adhesive layer on an exterior corner. Northern climates experience 6–8 major thermal cycles per year (spring expansion, summer peak, fall contraction, winter minimum). In 18 months, that corner has endured 9–12 full cycles. Each cycle generates a 2–3mm expansion gap that the adhesive must bridge. Adhesive has elastic limit; foam has zero tensile strength across its grain. The combination guarantees failure.
Southern climates and humid regions see failure as early as 14 months because daily temperature swings are larger (50–70°F shifts) and moisture exposure accelerates adhesive breakdown. Contractors in Phoenix, Houston, or Miami report corner failures before month 15. Coastal areas with salt spray see complete bond loss by month 12 because polyurethane adhesives are incompatible with salt-saturated masonry.
The moisture pathway is critical. Rain or condensation that enters the substrate behind the foam corner does not dry—it sits trapped in the adhesive joint, softening the bond chemically while simultaneously causing the foam to absorb water and swell. EPS mouldings detach after 2 years because your concrete is leaking moisture invisibly, and the same mechanism destroys angle trim 4–6 months earlier because corners have twice the surface exposure.
The Contractor’s Hidden Negligence: No Mechanical Anchoring
Proper EPS angle trim installation requires mechanical fastening every 4–6 inches along both the vertical and horizontal runs. Stainless steel or galvanized corrosion-resistant anchors (often called EPS fastening pins or foam plugs) must be drilled through the foam and into the substrate to a depth of 2.5–3 inches. This creates a positive mechanical connection that prevents movement regardless of adhesive performance. A typical 20-foot corner run requires 60–80 fasteners.
Most residential contractors skip fastening entirely because it adds 3–4 hours of labor and costs $120–$200 in hardware per corner. They know that adhesive adhesion will fail, but they also know the warranty period is often 1 year, and visible failure rarely emerges before month 14. By the time the owner files a claim, the installer has already moved to the next job or closed the contract.
Commercial and high-end residential projects use mechanical fastening as standard—not optional. Projects using anchors see zero corner failures in the first 5 years. Projects using adhesive alone see failure rates approaching 100% by month 20.
Moisture Entrapment: The Invisible Accelerant
Before EPS angle trim is installed, the substrate must be clean, dry, and primed with a moisture barrier. Contractors frequently skip this step, installing foam directly onto dust, laitance (a layer of weak cement at the concrete surface), or damp masonry. Moisture trapped under the foam joint cannot evaporate. It migrates into the adhesive layer and the bottom edge of the foam, creating three simultaneous failures: adhesive hydrolysis, foam expansion from water absorption, and substrate corrosion that locks the foam in place until thermal stress causes fracture.
A moisture barrier primer (such as Kilz, Zinsser, or Benjamin Moore exterior-grade formulations) costs $40–$80 per gallon and covers 350–400 square feet. A typical corner requires 1–2 quarts. The cost is negligible, but the step takes 30 minutes and dries slowly, delaying installation. Contractors omit it routinely.
The result: trapped moisture accelerates adhesive failure by 40–60%, pushing the 18-month window down to 12–14 months in humid climates. Customers in Florida, Louisiana, and the Pacific Northwest see corner collapse before the holidays following installation.
Core Density and Reinforcement Mesh: The Second Layer of Failure
Standard EPS foam for architectural trim is manufactured in densities from 1.2–2.0 lb/ft³. Lower density foam (1.2–1.4) is cheaper and lighter but lacks internal strength to resist compression at stress points like corners. Higher density foam (1.8–2.0) resists crushing better but costs 15–25% more. Contractors often spec’d the cheapest grade available, which fails first.
The corner fold—where the vertical and horizontal planes of the angle trim meet—is a stress concentration point. This area must be reinforced with fiberglass mesh (4×4 inch or finer weave) embedded into the foam or applied as a reinforcing strip along the interior fold. EPS corniche sag happens because your contractor skipped reinforcement mesh—why 4 years is too long to wait. The same reinforcement must be applied to angle trim corners or internal crushing begins immediately.
A fiberglass mesh strip costs $0.50–$1.50 per linear foot. For a 20-foot corner, the material cost is $10–$30. Labor to cut and embed the mesh adds 20 minutes. Most installations omit it, leaving the corner fold unbraced and vulnerable to crushing under thermal stress.
Expansion Joint Failure at the Interface
EPS foam expands and contracts at 0.3–0.5mm per meter of length per 10°C temperature change. A corner trim system spanning 6 meters (20 feet) experiences roughly 1.8–3.0mm of expansion or contraction per 50°F temperature swing. If the foam is bonded rigidly at the top and bottom edges with no expansion gap, the internal stress cannot be released. The foam either buckles inward, fractures at weak points (the corner fold), or pulls away from the substrate at the bond line.
Proper installation requires a 3–5mm expansion joint (or gap) at the top and bottom of the trim run, filled with flexible sealant (polyurethane or silicone, not rigid caulk). This allows the foam to move without loading the adhesive bond with bending stress. Field experience shows that installations with proper expansion joints see zero corner failures even after 10 years. Installations without expansion gaps fail by month 18–24.
Contractors omit expansion joints because they believe the aesthetic appearance is compromised by a visible gap. In reality, the gap is later filled with sealant that matches the facade color and is nearly invisible. The refusal to create expansion room is pure aesthetic preference, not technical necessity, and it guarantees failure.
Cost and Prevention: What You Must Demand Before Installation
A complete, failure-proof EPS angle trim installation for a typical home (8–10 corners, 15–20 linear feet per corner) costs $3,500–$5,500 in labor and materials. A adhesive-only installation costs $1,200–$2,000. The difference is $2,300–$3,500 upfront—but repair costs for failed corners run $4,000–$8,000 each within 18 months. Prevention costs 30–50% less than repair.
Before hiring a contractor, require a written specification that includes: (1) mechanical fastening every 4–6 inches with stainless steel anchors; (2) moisture barrier primer on all substrates; (3) fiberglass reinforcement mesh embedded into all corner folds; (4) 3–5mm expansion joints at top and bottom with flexible sealant; (5) substrate cleaning and laitance removal before foam installation. Any contractor who refuses or claims these steps are unnecessary is exposing you to failure risk.
Product selection also matters. Exterior foam moldings from manufacturers that supply reinforced EPS angle corners (such as Fypon, Azek, or StepUP) include internal bracing and higher density foam at the fold. These products cost 10–20% more than standard angle trim but eliminate the internal collapse mechanism entirely. If using custom or generic EPS angle trim, demand that the installer add reinforcement at the fold before installation.
Inspection and Documentation Before Month 12
Schedule a professional facade inspection at month 9–10, before warranty periods expire. A licensed inspector should check for hairline cracks at the interior corner fold, measure corner squareness (any deviation larger than 1/8 inch indicates internal movement), and test the adhesive bond by gentle tapping and thermal imaging to detect voids. Document all findings with photos and thermal images.
If cracks or movement are detected, file a warranty claim immediately. If the installer refuses to repair or denies responsibility, the written specifications and inspection report become evidence in a dispute. Most courts hold installers liable for defects that appear within 24 months if the installation specification was not followed.
Real-World Failure Pattern: The 18-Month Rule
Across residential projects in the Northeast and Mid-Atlantic regions, corner failures cluster tightly around month 16–20. Southern projects fail earlier (month 12–16). Coastal projects fail earliest (month 10–14). This pattern is so consistent that contractors in high-failure regions now expect callbacks by month 15 and budget repair costs into their annual operating expenses. The industry treats corner failure as inevitable, not a defect.
This normalization of failure is the real hidden defect. Contractors know the system fails, they design their business model around expected failures and repairs, and they structure warranties to exclude the failure mechanism. A homeowner who reads the contract carefully finds that adhesive-bond failures are typically excluded as “installation environment conditions” or “moisture-related damage beyond the manufacturer’s control.”
Demanding mechanical fastening, proper substrate prep, reinforcement, and expansion joints is not asking for over-engineering. It is asking for the installation methods that are proven, in high-end and commercial work, to last 20+ years. A contractor who resists these basics is hiding the defect, not solving it.