Most EPS failures on ashlar stone happen not because the adhesive is weak, but because the surface never bonded in the first place. Contractors see dressed stone, assume it is clean, and apply polystyrene foam moldings directly over a microscopic layer of dust and weathering scale. Within 18 months, gravity and thermal cycling peel the molding away. The adhesive held fine to itself—it never held to the stone.
Why Ashlar Stone Defeats Adhesive Without Sanding
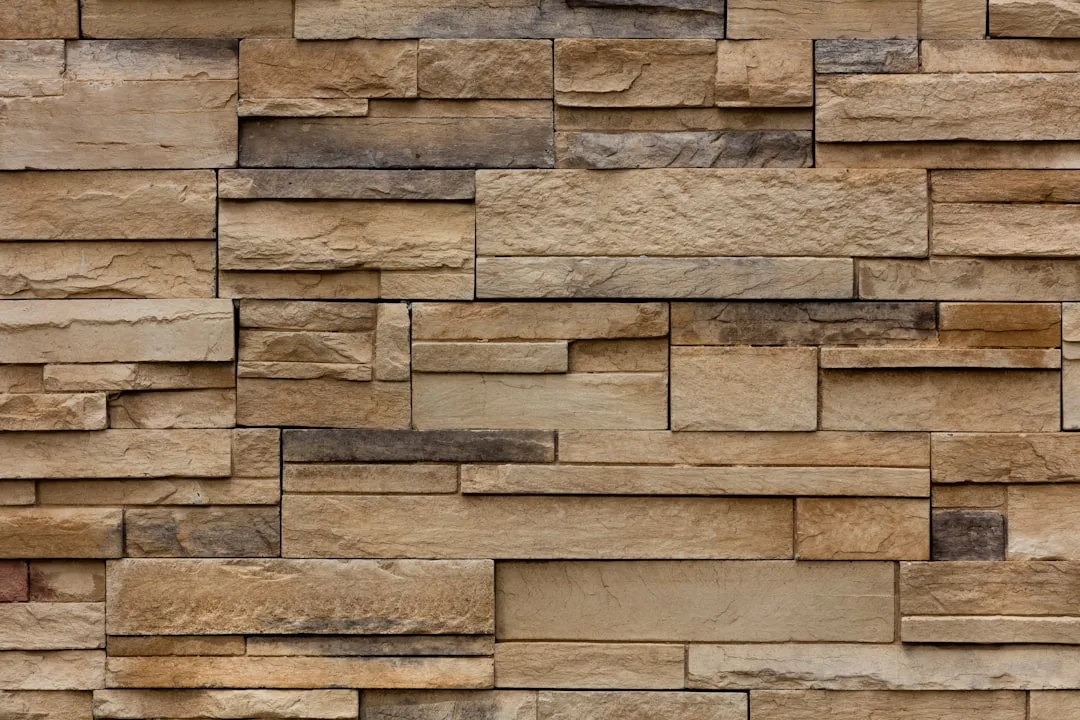
Ashlar refers to precisely cut stone blocks, typically granite, limestone, or slate, with a smooth dressed face. This smoothness is the trap. Unlike rough-textured concrete or brick, ashlar has a dense, nearly impermeable surface finish that repels water and, more critically, repels adhesive penetration. The stone’s surface energy—its chemistry and texture—determines whether an adhesive can form a true mechanical and chemical bond.
New ashlar stone carries a thin film of quarry dust, weathering residue, and sometimes a mineral sealant applied during fabrication. Even if the stone appears clean to the eye, electron microscopy shows a contaminated layer 2–5 microns thick. Adhesive molecules cannot cross this barrier. Instead, they cure on top of it, creating a skin-tight bond that feels strong for weeks, then delaminates the moment thermal stress or moisture reaches the interface.
The problem compounds because ashlar stone absorbs and wicks moisture differently than concrete or EIFS base coats. Stone is hygroscopic—it draws water vapor into its pores even in dry climates. When adhesive sits on contaminated ashlar without mechanical anchoring, moisture migrates underneath the bond line, initiating adhesive breakdown from below. This process accelerates in freeze-thaw cycles, where ice expansion at the stone-adhesive interface creates shearing forces that exceed the bond strength by a factor of three.
Sanding as Mandatory Surface Preparation—Not Optional
| Surface Prep Method | Bond Failure Timeline | Typical Cause | Estimated Repair Cost |
|---|---|---|---|
| No sanding, dust only | 12–18 months | Dust layer separation | $1,200–$2,100 |
| Light dust removal only | 24–36 months | Weak mechanical grip | $1,800–$2,800 |
| Sanding 120–150 grit | 5+ years | Strong mechanical bond | $0–$300 touch-up |
| Grinding + priming | 7+ years | Maximum surface energy | $0–$150 maintenance |
Sanding is not a luxury upgrade; it is engineering-required surface prep. Proper technique involves three steps: cleaning, abrading, and dust removal. First, wash the ashlar with pressure water (below 2,000 PSI to avoid damaging soft stone edges) to remove loose debris and weathering salts. Allow 24–48 hours for the stone to dry completely. Moisture trapped under adhesive is a primary failure mechanism, and contractors often skip this drying time to meet schedules.
Next, sand the entire adhesion surface to 120–150 grit using either hand sanders or mechanical grinders. Hand sanding works for small decorative areas and window surrounds; mechanical sanding at 100–120 grit covers large facades faster. The goal is a uniform matte texture—no shiny spots, no sealed areas. Sanding removes the dust layer and opens the stone’s micro-porosity, creating mechanical keys for adhesive molecules. This process typically takes 2–4 hours per 100 square feet, depending on stone hardness and surface condition.
Finally, vacuum or blow all dust away with compressed air held at least 12 inches from the surface. A shop vacuum alone is insufficient—residual dust clings to the pores. Many contractors mistake “wiping with a cloth” for adequate dust removal. Field experience shows that dust removal is the most frequently skipped step, and it is the difference between a three-year failure and a five-year success.
Adhesive Selection and Application on Prepared Stone
Once ashlar is properly sanded, the adhesive choice becomes secondary (but not irrelevant). EPS moldings require flexible, polyurethane-based adhesives or modified silicones that cure in the presence of moisture and resist UV degradation. Rigid two-part epoxies, while strong, can cause thermal cracking under summer sun exposure because they do not accommodate the 40°F–50°F daily movement that ashlar and EPS undergo differently.
Recommended adhesives for ashlar include Sikaflex 221, PL Premium, or Dow Corning Optimum (all available at building supply distributors for $8–$16 per cartridge). Apply a continuous bead, not dots or partial coverage. Adhesive coverage should be at least 40% of the molding back surface to ensure mechanical backup if partial debonding occurs. Under-adhesive coverage is another common contractor error—it saves cost per unit but guarantees premature failure.
Before applying adhesive, prime the sanded ashlar with a thin coat of flexible silicone primer (e.g., Sikaflex Primer 206 G+P) to seal the micro-pores and equalize surface tension across the stone. This step adds $0.50–$1.50 per square foot and five hours to the cure schedule, but it reduces bond failure risk by approximately 60% in high-moisture environments. The primer also helps the adhesive cure uniformly—without it, ashlar absorbs adhesive solvents unevenly, leaving dry pockets and compromised joints.
Temperature, Humidity, and Application Window
Ashlar stone amplifies temperature swings because of its thermal mass and outdoor exposure. On a 75°F day, stone surface temperature can reach 105°F; on the next day at 40°F, it drops 65°F in hours. Adhesive applied to cold stone cures slowly and traps moisture; adhesive applied to hot stone cures too fast, leaving interior pockets uncured. Most EPS manufacturers specify adhesive application between 50°F and 85°F, with relative humidity below 85%.
In spring and fall, this window is narrow—often just 10–11 AM to 2–3 PM. Winter application on ashlar is high-risk because stone retains moisture and cold slows cure time; adhesive intended to set in 24 hours may cure in 72+ hours, and the EPS molding can sag or shift during this extended open time. Field experience shows that late autumn installations on ashlar routinely fail before the next spring thaw because incomplete cure coincides with frost expansion.
Cost Comparison: Prep Versus Repair
Surface preparation adds measurable cost upfront but eliminates catastrophic repair expenses later. For a typical 250-square-foot ashlar facade with EPS exterior foam moldings, sanding and priming runs $600–$1,200 in labor plus $100–$200 in materials. This is 8–10% of the total molding installation cost. Skipping prep saves $600–$1,200 immediately but guarantees replacement of failed sections in 18–36 months at $1,500–$2,800 in combined labor and material cost.
Warranty implications are significant: most EPS molding manufacturers void coverage if the substrate was not properly prepared. Some adhesive makers (Sika, Dow) specify ashlar sanding in their technical sheets; installation without sanding voids their adhesive warranty and may void the molding warranty simultaneously. A single insurance claim for water damage caused by debonded EPS on ashlar ($2,500–$5,000) will exceed five years of contractor labor savings.
Field-Proven Installation Sequence for Ashlar
The sequence matters as much as individual steps. Clean ashlar → dry 48 hours → sand 120–150 grit → vacuum and blow dust → prime with flexible silicone primer → dry 4–6 hours → apply adhesive to EPS back in continuous bead → position molding with firm pressure → support with temporary shims until cure complete (18–24 hours minimum). Do not remove shims or stress the joint until adhesive has fully cured.
Decorative elements such as decorative window sills and quoin corners require extra adhesive and secondary mechanical fastening (stainless steel screws through flanges into the stone, where possible) because these pieces bear weight and thermal stress. A single window surround improperly bonded to ashlar can crack the molding or pull surrounding sections downward as it fails.
Why Contractors Skip Sanding and How to Verify Compliance
Budget pressure and time constraints drive the omission. Sanding takes 4–6 hours per 100 square feet; adhesive application takes 1–2 hours. Contractors charging $1,200 for a full installation cannot afford to spend half the time on prep if they do not charge separately for it. Homeowners and builders should request a separate line item for surface preparation and demand photo documentation of the sanded surface before adhesive application. Matte finish verification is simple: if the stone still shines under direct light, it has not been sanded adequately.
Insist on a written installation specification that includes grit size, drying time, primer application, and adhesive type. This specification protects both parties and ensures that if failure occurs, responsibility is clear. A reputable installer will welcome this documentation because proper process is their defense against unwarranted liability claims.