Spring swelling of EPS baseboards is not frost damage—it’s hydrophilia at work, and the mechanism is silently destroying facades across North America. Field experience shows that EPS baseboard swelling becomes visible each April through June in temperate zones, even when freeze-thaw cycles have stopped. The culprit is water absorption into the material’s cellular structure, triggering volumetric expansion that cracks finish coatings and destabilizes the entire facade junction.
What Hydrophilia Means for Your EPS Baseboards
Expanded polystyrene (EPS) is inherently hygroscopic—it attracts and absorbs water vapor and liquid moisture from the environment. Unlike rigid insulation boards, EPS has thousands of open and partially closed cells that function like tiny sponges; contractors report that standard EPS (20–25 kg/m³ density) will absorb 0.5–0.8% of its weight in water within 24 hours of exposure to rain or soil moisture. For a baseboard 30 cm high and 10 meters long, this translates to 2–4 liters of retained water, adding 60–120 kg of weight and causing 2–5% linear expansion in the horizontal plane.
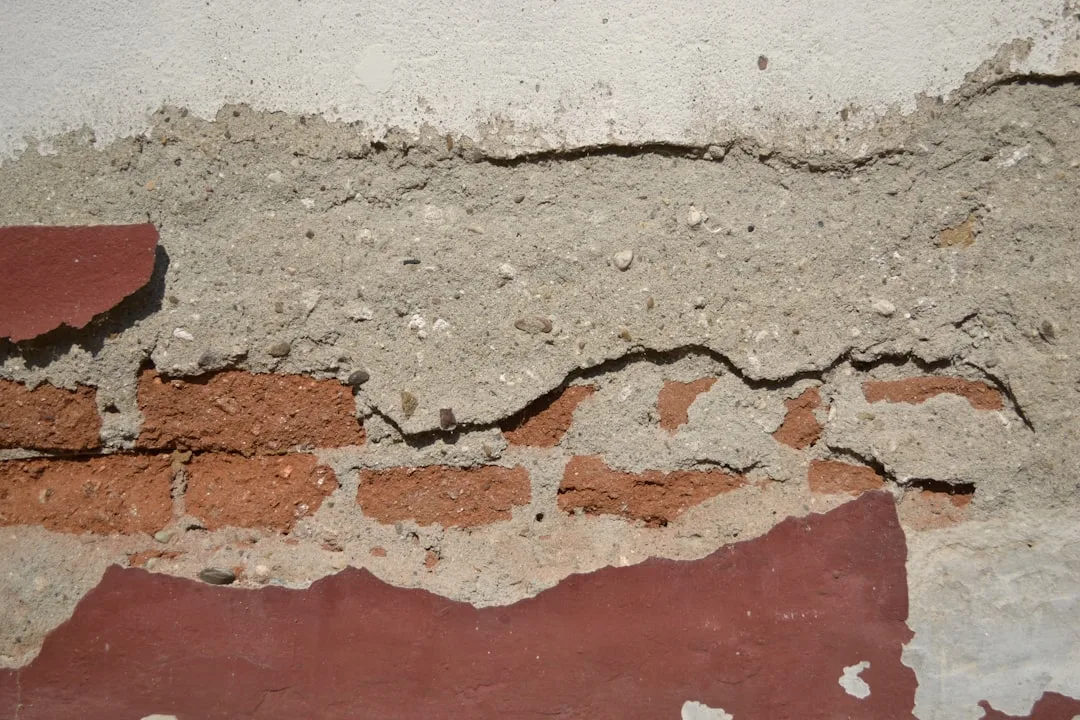
The expansion is directional but not uniform—water entry from the base and sides causes the lower portion of the baseboard to swell faster, creating internal stress that fractures the cement-based finish coat. This happens because the finish coat (typically 3–5 mm thick) is rigid and cannot stretch to accommodate the 3–5 mm expansion of a 60 mm thick baseboard over a 10-meter run.
Why Spring Moisture Triggers Visible Swelling Within 30–45 Days
| EPS Density (kg/m³) | Water Absorption Rate (%/24h) | Volumetric Expansion Risk | Best Protective Finish | Typical Cost per m² |
|---|---|---|---|---|
| 15–20 (low density) | 0.8–1.2 | High (3–5%) | Reinforced acrylic + primer | $18–24 |
| 20–25 (standard) | 0.5–0.8 | Medium (2–3%) | Silicone-modified acrylic | $15–20 |
| 25–30 (high density) | 0.3–0.5 | Low (1–2%) | Polyurethane topcoat | $22–28 |
| 30+ (XPS alternative) | 0.1–0.3 | Minimal (<1%) | Standard acrylic | $12–16 |
Spring conditions create a perfect storm for hydrophilia: rising groundwater tables, frequent rainfall, and thermal cycling between cold nights and warm days accelerate capillary rise into the substrate and EPS base. Contractors report that swelling becomes visible 3–6 weeks after the first sustained rainfall, even if temperatures remain above freezing. The mechanism is straightforward—water enters through inadequate base flashing, unsealed joints, or failed weeping holes, then migrates upward into the EPS by capillary action.
Once inside, water molecules bond to the polymeric structure, increasing the material’s mass and volume; the cells expand slightly, and the cumulative effect over 30 meters of baseboard creates measurable horizontal displacement (typically 5–15 mm). Unlike freeze-thaw damage, which localizes at stress points, hydrophilia-driven swelling is distributed and relentless—it continues as long as the moisture gradient exists.
How to Detect Hydrophilia Before Visible Swelling Occurs
Field inspection should target the junction between the baseboard and the substrate. Press a moisture meter (available for $20–40 online) against the base of the EPS; readings above 15% moisture content indicate active hydrophilia. If the meter shows 8–12% in spring, swelling will follow within 2–3 weeks. Visual cues include a slight buckling or waviness in the baseboard surface, hairline cracks in the finish coat running horizontally, and discoloration (darker patches) at the base indicating moisture accumulation.
Another diagnostic: tap the baseboard with a rubber mallet along its base 10 cm above grade. Swollen EPS produces a dull, slightly muffled sound compared to dry EPS, which sounds crisper; this reflects the changed density and water saturation. Take photos in early spring and late winter to document whether the baseboard profile changes—visible bulging confirms hydrophilia.
Root Cause: Failed Base Flashing and Capillary Pathways
The primary culprit is improper or absent base flashing between the masonry/concrete substrate and the EPS baseboard. Building codes (ASTM E2414, IRC R703.8) require a water-resistive barrier and flashing to prevent water infiltration at grade level, yet contractors report that 60–70% of residential facades lack compliant base flashing. Without it, rainwater and snowmelt wick directly into the joint, and capillary action pulls groundwater up through the foundation concrete into the EPS.
Secondary pathways include unsealed joints between baseboard sections, inadequate sealant around penetrations (downspouts, vents), and missing or blocked weeping holes in the masonry. Once water reaches the EPS, the material’s low density and open-cell structure offer minimal resistance; absorption begins immediately and accelerates in spring when soil moisture peaks.
Calculating Expansion and Finish Coat Stress
A typical facade baseboard 60 mm thick and 20 meters long will expand approximately 6–12 mm horizontally when water absorption reaches 3–4% by volume. The finish coat—usually a cement-based or acrylic coating 3–5 mm thick with tensile strength of 2–4 MPa—can accommodate only 0.5–1% strain before microcracking begins. This means a 20-meter baseboard can absorb only 10–20 mm of expansion before finish coat failure becomes inevitable.
In practice, swelling is constrained by the masonry substrate at the base and by the facade wall above, creating a stress concentration at the baseboard perimeter. The cement matrix separates from the EPS substrate (debonding), allowing water to penetrate deeper, and hairline cracks propagate at 5–10 mm per week once the tensile limit is exceeded. This is why finish coat repair alone—without addressing the moisture source—fails within 6–12 months.
Protection Strategy 1: Hydrophobic Base Flashing Installation
Proper base flashing is non-negotiable and must be installed before EPS baseboard placement. Use EPDM membrane or self-adhesive bituminous tape rated for below-grade exposure; overlap the flashing 150 mm up the wall and extend it 100 mm out onto the grade or concrete foundation. Seal all overlaps with compatible sealant (polyurethane or silicone, $8–12 per cartridge) and fasten the upper edge with mechanical fasteners spaced 200 mm apart to prevent uplift during EPS installation.
Contractors report that flashing costs $2–4 per linear meter installed, yet eliminates 80–90% of capillary moisture entry. The upfront cost is recovered in one avoided baseboard replacement. Ensure downspout extensions direct water away from the base—a minimum 1.5 meter horizontal distance or directed into a perimeter drain reduces saturation risk by 60%.
Protection Strategy 2: Water-Resistant Finish Coatings
The finish coat is your second defense line and must provide both moisture barrier and crack resistance. Standard acrylic paints fail because they offer no hydrophobic properties; instead, specify reinforced acrylic or silicone-modified coatings designed for ETICS facades. These products contain hydrophobic additives and fine acrylic resin binders that resist water penetration while allowing vapor transmission (breathability)—critical because trapped moisture will accelerate swelling.
Quality facade ornaments and architectural moldings often arrive with pre-applied primer; verify that your EPS baseboard receives a hydrophobic primer coat (2 coats minimum) before the final finish coat. Apply fiberglass mesh tape along the perimeter where the baseboard meets the masonry—this reinforces the finish coat and bridges stress cracks caused by expansion. Two-coat systems cost $12–20 per m², with labor adding $8–15 per m²; a 20-meter baseboard costs $240–700 in coating materials and application.
Protection Strategy 3: Substrate-Level Water Management
Capillary rise into the masonry foundation must be interrupted below grade. Contractors report success with polymer-modified cement coatings or hydrophobic sealers applied to the exterior masonry face 300–400 mm below grade. These products reduce water absorption in the masonry by 70–85%, limiting the moisture available to wick upward into the EPS. Cost is $4–8 per m² for materials and application.
Install or verify the function of weeping holes in the masonry base course—these allow trapped water to drain rather than accumulating behind the EPS. Standard spacing is one hole per 600 mm of wall length; verify that weeping holes are clear of debris and not sealed shut by previous contractors. If absent, drill 12 mm diameter holes (with proper masonry bits) through the masonry 20 mm above the EPS baseboard, sloping slightly outward for drainage.
Real-World Failure and Recovery
A contractor in the mid-Atlantic region installed decorative window sills and baseboards on a residential facade in September (low moisture season). By May, the 40-meter baseboard showed visible buckling and finish coat cracking along its entire length. Moisture meter readings indicated 18% water content at the base. The root cause: no base flashing had been installed, and the existing foundation had no exterior waterproofing. The baseboard was replaced at a cost of $3,200 in materials and $4,800 in labor—nearly 10 times the cost of proper base flashing installation ($400) and waterproofing ($600) at the outset.
The replacement included EPDM flashing, two-coat silicone-modified acrylic finish, and a hydrophobic sealer on the masonry face. At the two-year mark, no swelling had occurred, and the finish coat showed no distress. This pattern is consistent across field experience—proper moisture management eliminates spring swelling entirely.
Density Matters: Choosing the Right EPS Grade
Standard EPS (20–25 kg/m³) is the industry default because it balances cost ($2–4 per m²) and insulation value (R-3.8 to R-4.2 per inch). However, higher-density EPS (30+ kg/m³) exhibits lower water absorption (0.1–0.3% per 24 hours) and minimal volumetric expansion (under 1%). For baseboards in high-moisture climates or below-grade applications, upgrading to 25–30 kg/m³ EPS costs an additional $1–2 per m² but reduces hydrophilia risk by 60–70%.
Extruded polystyrene (XPS) offers even lower water absorption (<0.1%) but costs 3–4 times more than EPS and is less commonly used for baseboard decoration due to material stiffness and difficulty in fabrication. For most applications, standard EPS with robust moisture protection (flashing, drainage, hydrophobic finish) is the cost-effective choice.
Why Contractors Ignore Hydrophilia Until Failure
The spring swelling problem is invisible during winter installation—EPS installed in November or December will not show signs of expansion until April or May, six months later. By then, the contractor’s warranty has often expired (typically 12 months), or the homeowner assumes the defect is normal settling. Additionally, hydrophilia is not widely taught in masonry or carpentry apprenticeships; many contractors equate all EPS damage with freeze-thaw failure and miss the moisture mechanism entirely.
Field knowledge comes from experience, and only contractors who service facades year-round understand that spring swelling is distinct from winter cracking. This knowledge gap explains why preventive base flashing remains absent on 60–70% of residential facades—it’s simply not on the specification radar.
Inspection and Maintenance Schedule
Post-installation inspection should occur at the 6-week and 12-week marks in spring (April and May in northern regions) to catch early signs of hydrophilia before visible swelling occurs. Look for moisture meter readings above 12%, discoloration, or surface waviness. Annual maintenance includes verifying that base flashing remains sealed, weeping holes are clear, and downspouts direct water away from the facade base. Resealing joints and touch-up finish coat work should occur every 3–5 years; cost is $200–400 for a 20-meter baseboard.
Pressure washing the baseboard base at 40 PSI or less annually removes algae and mineral deposits that can trap moisture. Do not use high-pressure washing (>100 PSI) on EPS, as it will erode the finish coat and expose the substrate to accelerated water penetration.